
Thursday, 27 November 2014
Some useful poses.
Firstly, sorry about the lateness of the post, I got held back at uni and didn't return home till late. So, my sister requested some pose references. She didn't specify so I did floating, crouching, running, standing sassily, sitting and riding a horse! Hope you guys can make use of it. Notice how the construction is always the same, set out the little skeleton and the flesh becomes easy(er) :3. I also added in a little detail on a bridle, the nose band and cheek pieces are separate don't you know. ;)
Wednesday, 19 November 2014
Manga vs. real life.
Sorry guys I have had literally no time over the weekend so this one is going to be short. It's all well and good learning to draw your characters in manga style but what if you want a more realistic look for a sci-fi art? Perhaps you want to convert a real person into manga form? They are worlds apart, or are they? Take a look (my apologies for the awful scan, I had to use pencil).
 Manga is essentially an accurate, but simplified, portrayal of human anatomy. Everything you already know still applies. The eyes and eyebrows are still in the same place (but may be a little smaller in real life depending on how big your character's eyes were in the first place), the mouth is the same lines (honest) just with more detail around the lips and the face is even a very similar shape although in the more lifelike style the lines are more curved and organic looking rather than 'pointy'.In fact, the biggest difference is the hair. Manga hair, although wonderfully gravity defying, would not look quite the same in life. The trick to anime hair in a more realistic style is draw the hairs flowing in the same way as the manga image, but in a smooth way with less exaggeration. If you get stuck you can style your own hair or look on the internet to find out how hair flows when pushed back etc. The hardest part is the nose. All I can say is loko at pictures of real people to get a feel for it. The nostrils are in the same place, it's just the flesh around them that gets difficult to shade.
If you are going the other way, a real model (perhaps yourself) in anime form, try squinting. Can you see from your blurred form whether you have a relatively pointed or square jaw shape? Take a close look at your eyes (you can stop squinting now) to determine which shape of anime eye fits you best and that should be all you need to get started. The hair is the hardest part as this is where you have to tactfully exaggerate a little bit. Anime hair flows in defined spikes and tresses. Look at the image on the right first and study the distinguishing characteristics of the hair (general shape, where it is pushed back slightly at the forehead to part it from the face) and the look how they have been represented on the left. The nose is obviously simplified to a few lines, but it can be tricky to pick which ones. In fact manga is harder to draw well than a lifelike portrait because any error is easily seen due to the simplicity.
I suggest you go off and manga up your favourite actors and family for practice! At the same time try drawing a more realistic version of your favourite manga characters to see what they would look like (Timothy here looks oddly familiar in the lifelike drawing... scary). See you next week!
Wednesday, 12 November 2014
So you need some animal companions? Box fits all theory.
It is impossible to have a faithful knight without his noble steed, or perhaps your character is a farmer and needs some animals? This is a quick reference that, more than enabling you to draw a specific animal, teaches us that it is the square and not the dog, which is our best friend when it comes to drawing the animal kingdom.
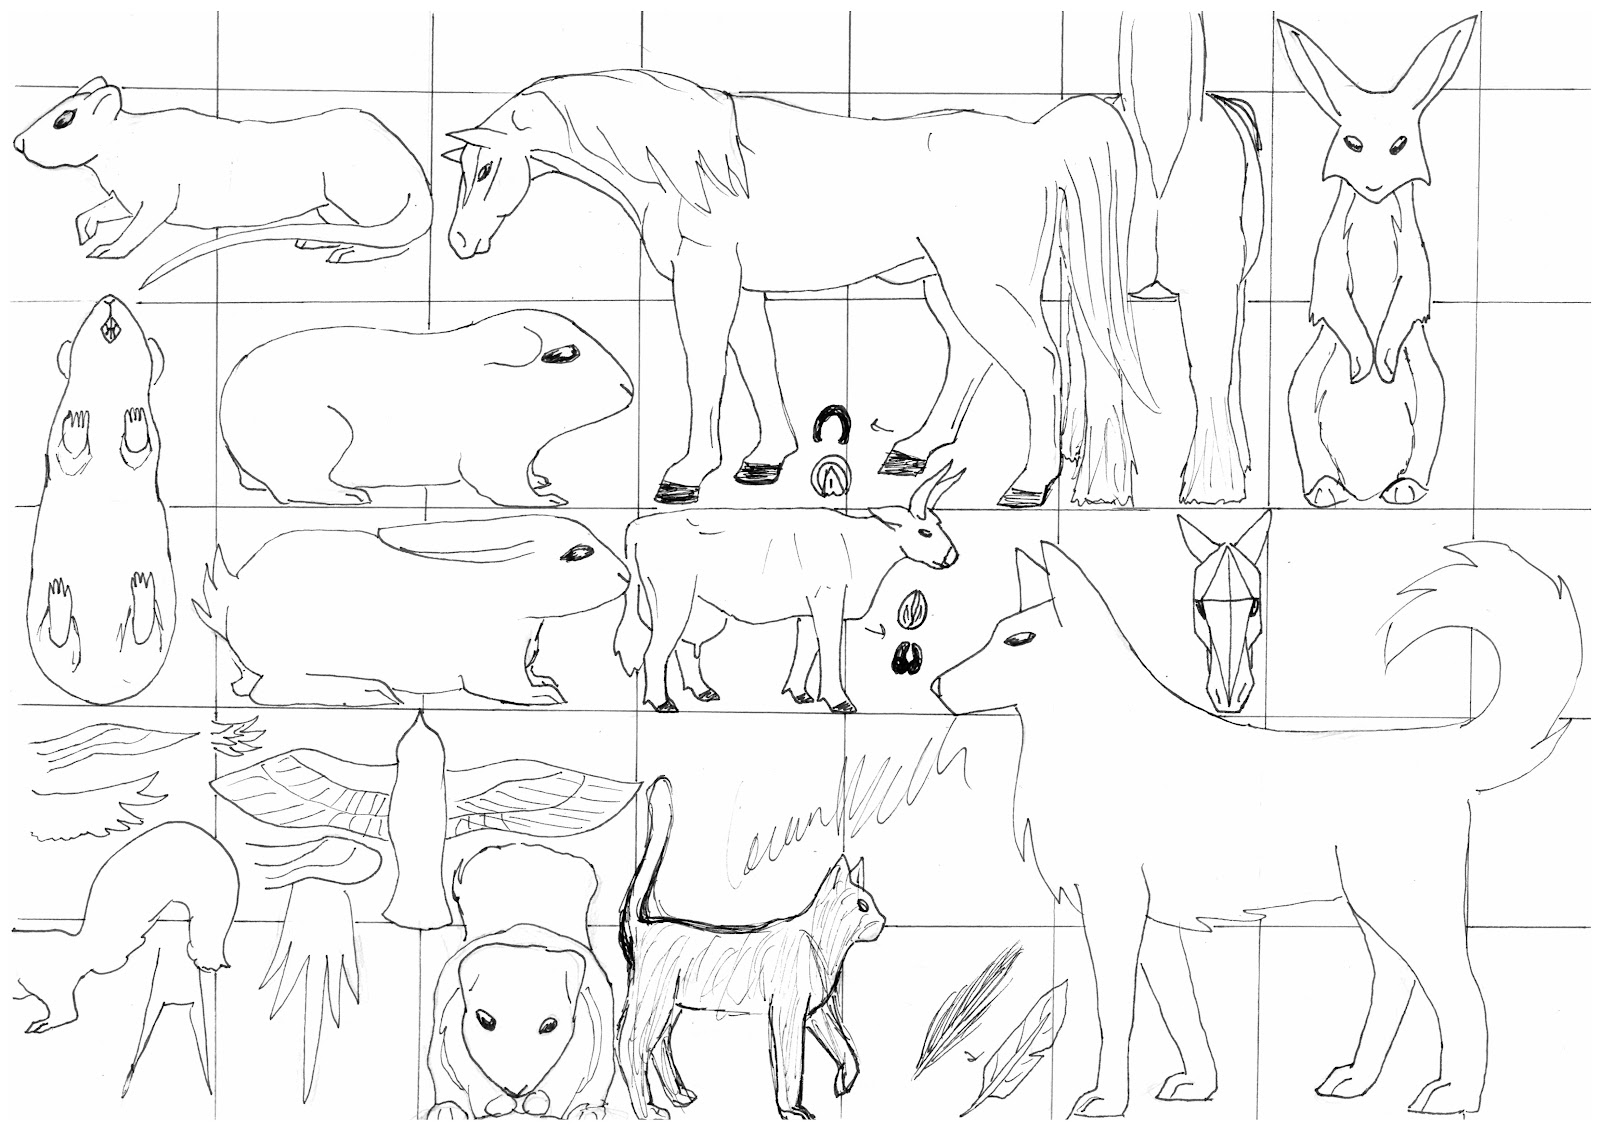
Using a combination of squares, we can map out the space for a body plan of almost anything. Here I will use the horse as a detailed example.
The body of a horse fits roughly into a square.If you subdivide this square into another four squares, the upper two will be the body and the lower the legs. The withers (highest point of shoulder) is halfway along one of the smaller squares (same for the highest point of the rump). The legs were drawn a little thick here for the type of horse the head and neck would suggest (head, rump and neck are more Arabian whereas the legs and shoulders more heavy warmblood). The head here is also a little small (making the horse look more feminine despite it being male… oops XP). For a more masculine horse the head should be about the length of it’s scapula (shoulder blade, google horse skeletons). The front of a horses head is drawn using a diamond as a guide.
Also on a more random note, if the horse is male, don't be shy, draw his sheath! There are many species where nothing is visible at the usual angles due to legs or fluff, but drawing a male horse without his sheath is like drawing a cow without her udders... it just doesn't look right. Also, ignore my terrible udders, she does have four teats, I forgot to draw the other front one and the hind are behind her legs. XD
Looking around you can see that the dog, cat and cow have similar body plans but body size makes the legs look longer or shorter. One point to note, the cow has cloven hooves, not round single hooves like a horse.
When it comes to rodents and lagamorphs (yes, bunnies are NOT rodents people) two squares side by side works to demarcate a space for rabbits and guinea pigs. Rats are a bit slimmer so about two thirds to three quarters of the height. Mice are chubby little beings and I couldn’t get one to look right so there is some homework for you. Draw a mouse in a box for me! Two boxes also works for a rabbit sitting up (notice how the rabbits and rodents all seem to have roughly diamond shapes heads) but obviously the whole width isn’t taken up (unlike the horse). Don’t count the toes on the guinea pig from below… I forgot how many they are supposed to have. XD The squirrel is similar with a big fluffy tail, see the picture? Lots of common animals are very similar in body plan.
Birds perhaps vary the most. The full bird drawn here is distinctly ‘average’. Probably a sparrow or something. Some wind examples are shown, long and thin being for falcons and gulls, deep fingered for crows and hawks, rounded for an owl etc. Also a swifts tail (forked) and a parakeets in flight (they are a lot pointier when not fanned out at rest but are held like this for flying).
Take away the ‘box theory’ and see what you can make of it. Tall animals, short animals, all animals! Perhaps use two boxes on top of one another to draw the body and legs of a giraffe, adding the head and neck on like with the horse? As you get more experienced you can drop the boxes and sketch the animals from photo's/life instead to get a more natural feel for variation.
Surprise me with what you can do and drop me a link in the comments or at my deviantart (VulcanVet).
See you next week!
Thursday, 6 November 2014
The rules of realistic manga hair.
Now here is a difficult thing to write a reference for. Hair. The number of styles are literally infinite but never fear, there are only a few simple rules one needs to follow to get convincing hair.

The first thing you will want to note is where the hair comes from (very useful for both long and super short styles). The first four sketches give you a rough idea, but there can be variations (some people have a straighter hairline rather than a v shape etc.). Whereas women tend to have little if any hair before the ears, guys can grow sideburns there if you want (all depends on how they shave, but that's for another tutorial).
When you are comfortable with where the hair sprouts from it is time for the fundamental rule. HAIR IS NEVER STRAIGHT! Sure the hairs themselves can be, but even in straight hair with a straight cut edge (first example) the line flow and curve as the hair falls over the skull, neck, shoulders, anything really. More men will have a natural looking edge to the hair though (second example) as the straight cut tends to be on longer styles (although I have seen a short haircut with straight edges drawn very well indeed).
Curly and wavy/tight curls/fuzzy/crimped are not as hard as they look, they just take a lot of time and effort to draw. Large curls can be loose (first of second row) or tight, and look like bouncy zig zags. Not many guys will have their curly hair in neat ringlets though, so tighter/messier curls can be indicated with a wavy edge to the hair and a rough texture (which I really should have shaded in for you but I ended up leaving it for the hair shading and detail tutorial). The tinier the ‘bumps’ on the edge of the hair, the tighter the curls appear.
The next few examples on this line are merely to demonstrate the two main types of bangs. Up and down. If hair is swept up before falling back down then obviously the hairline will be visible as a small triangle. If the hair just sweeps straight down then you can treat it like any other part of the hair. You can have both up and down bangs on the same style, go nuts!
Next is an example of a three strand braid (left) and a terrible example of a four strand braid (right) along with some references to different styles. The hair can be cut with or without layers, left loose or tied up (or both - note the shape of the top of high ponytails/buns and the line where the hari changes direction when only half of it is tied up), long or short. Long hair (even a ponytail) has the choice of all being pushed behind the shoulders or some behind and some in front (or all in front, works well for low ponytails). Hair can also be spiked up. I was lazy, the spikes will not go all the way to the skull as shown here they will all be slight outside. ‘Do as I say not as I do’ I believe is the saying for this situation.
Also, it goes without saying you can also part the hair any way you want, centre or side, all in personal taste.
Hope you make good use of this reference sheet to invent some wacky new hair styles using the basic rules.I am always running out of hair ideas as I am so boring. Post a comment or pop along to VulcanVet at deviant art to show me what you can do!
Wednesday, 5 November 2014
Oh that darn scanner...
Sorry guys. Big hair tutorial will be up tomorrow when I can find a working scanner. ^^; Sorry.
Friday, 31 October 2014
Halloween special - How to draw animal ears on people (guest appearance of vampire fangs).
Here is part two of the 2014 Halloween special, animal ears! My character Jamie has a little secret to reveal, he is in fact half kitsune and sports a very large and fetching pair of ears when he isn't hiding them with magic.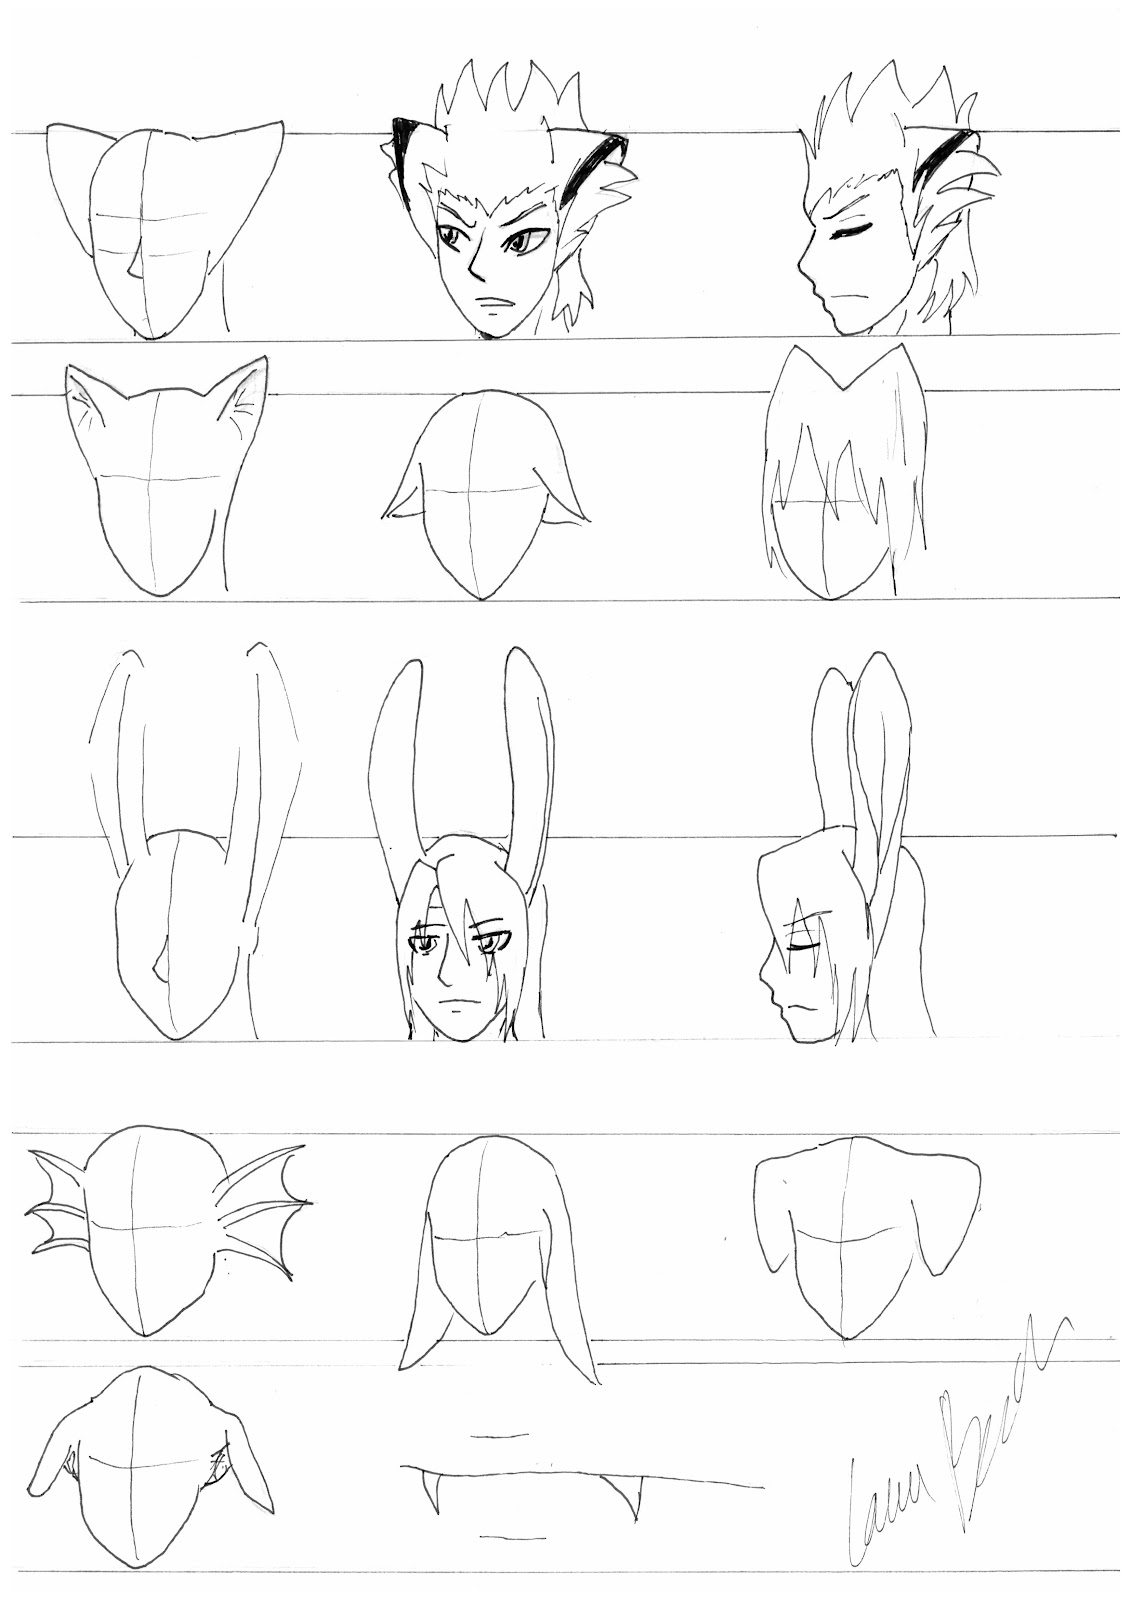
There are as many variations of ears as there are animals, but for the two step by steps I have chosen Jamie (fox ears) and Storm (rabbit/hare ears) to represent triangular and tall respectively.
For triangular ears I recommend drawing the top line first, then connecting back to the head depending on the size and set of the ears. Jamie’s are low set and large. Next a line is drawn to separate the inside of the ear from the outside and the inside is filled with fluff. Jamie has very unique markings in the form of a black ear stripe, when for a fox usually the whole top of the ear would be black. Profile is always hard, here he has the ear tilted back slightly to make things easier.
Below we have high small (perhaps a cat?), low small (drooping sadly) and ‘in hair’ high small triangular ears.
Storm’s hair and ears are usually black, but I have left them white so you can see the detail. For tall ears like this, instead of drawing a topline you draw a ‘support line’ as I like to call it. Basically a representation of the inner centre of the ear (imagine a stick up the middle of a fabric ear holding it up. From there I sketch out the slightly triangular shape of the outer ear. The opening can only really be seen clearly from the side (and here the triangles are on both sides, making a distinctive diamond shape). Note the ‘support line’ actually makes a useful defining line if the inside of the ear can be seen.
Many other ears follow the same pattern when it comes to location. Don't let strange shapes deter you. The 'aquatic monster' ear is three spines joined with curved lines radiating from the rough location of the human ear. Same with the roots of most ears. They often look more realistic if you can draw them where normal human ears go although smaller cat ears especially can look good on the top of the head as well. Construct droopy rabbit ears the same way, just with a little more curve and obviously going the other way! Floppy Labrador ears are drawn top first like Jamies, then curving down into a triangle shape. Greyhound ears are again drawn top line first, then sweeping back up to the main folded section that connects to the head.
Just a pet peeve, I have seem many people draw fangs too large and too straight! Look at my little example to see they are set where your canines would be (obviously) and are curved and do not extend below the bottom lip. These fangs are visible yet elegant to make your vampire as menacing and attractive as possible. ;)
Go get some photo's of animals. Almost any ear can be constructed with the 'top first' or 'support line' method. There are an infinite number to choose from (bear ears, like rounded cat ears, are particularly cute) so go pick an animal and make your own!
Halloween special - How to draw manga animal tails on humans.
Welcome to part one of the 2014 Halloween special, tails! These fabulous appendages come in all shapes and sizes, but are all constructed in a similar way. Don’t believe me? Look below.

To start a tail, a line is drawn from root to tip (however long you want). The location of the root is very important. The tail will be an elongated tail bone and thus comes out of the base of the spine, not the middle of the bottom as I have seen people do before. There can be a slightly higher or lower set, but remember it still should still look as if it could realistically be an elongated tail bone (as that is what all tails are after all).
The only difference is how you flesh it out. For a cat, you flesh it out relatively slim with a squared off end, for a fox or fluffy dog lots of fluff, a devil add a triangle to the end. You can have them short (like the rabbit/hare/deer tail shown here) or long, thick or thin depending on the species. Most of the difference in thickness will be fluff…
Another suggestion, look at the tails above and see if you can make a dragon (thick at base, tapers to tip, scaly) and a horse (just a bit longer than the deer/rabbit but as thin as a cat with long silky hair). The horse should be the most difficult. The ‘dock’ (and thus the movable part) only reaches the ‘bottom of the bottom’ but the hair can be ground length, making it look as though it has very narrow range of motion compared to a fox for example, when it is actually just short.
Get creative and start working on your spooky characters! My deviant art account is http://vulcanvet.deviantart.com/ - don’t be shy, drop a comment and show me your work! I would love to see what tail variations people can think of.
Subscribe to:
Comments (Atom)